This getting started guide covers the processes of editing, deactivating, reactivating, cloning, and deleting a form.
Editing, Deactivating, Reactivating, Cloning And Deleting An Existing Form
Step 1 : Go To The Caldera Forms Admin Page
Starting from the WordPress Dashboard, you can navigate to the Caldera Forms Admin Page by hovering over the Caldera Forms icon and in the drop-down menu clicking on Forms.
Step 2 : Editing An Existing Form
Edit a form by hovering over 1 form from the list of built forms and clicking on Edit. You are now in the Caldera Forms Layout Builder.
Step 3 : Deactivate And Reactivate An Existing Form
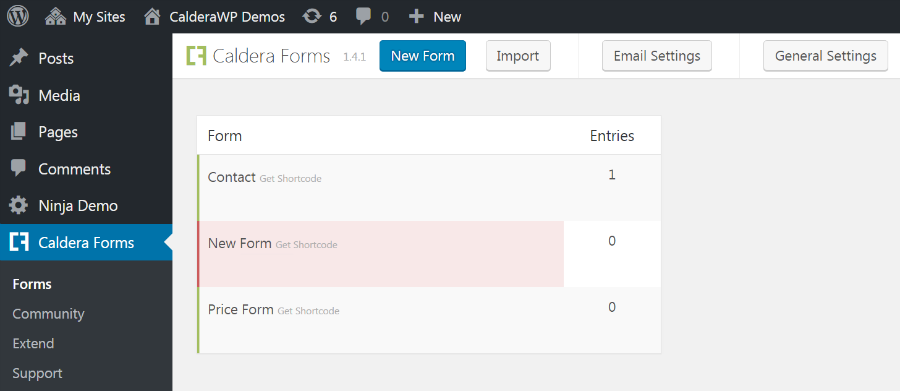 Deactivate a form by hovering over 1 form from the list of built forms and clicking on Deactivate. The form is highlighted in red, to signify it’s deactivation. Reactivate a form by hovering over any highlighted in red and clicking on Activate.
A deactivate form’s entries and configuration maintain. Attempting to load the form will no longer work. This is useful when you need to turn a form off, but want access to entries.
Step 4 : Clone An Existing Form
Cloning an existing form makes a duplicate of that form that you edit and publish separate from it’s original.
Clone a form by hovering over 1 form from the list of built forms and clicking on Clone. This launches the Clone Form pop-up window. Enter a Form Name, then click Create Form. You are now in the Caldera Forms Layout Builder.
Step 5 : Delete An Existing Form
Deleting a form looses its configuration and entries which is not reversible.
Delete a form by hovering over 1 form from the list of built forms and clicking on Delete. You receive a prompt: “This will delete this form permanently. Continue,” so click OK. The form removes itself from the Caldera Forms Admin Page list.