Creating a front-end post editing form in WordPress is simple with the help of the Caldera Forms Custom Fields add-on. In this tutorial, you will learn how to create a form, that is displayed to all users with privileges to edit posts, in the front-end of your site.
Make sure you have the Caldera Forms and the Custom Fields add-on installed and activated before beginning this tutorial.
Creating a Front-End Post Editing Form

First, we will need to create a Caldera Form that will replicate the default WordPress editor to our liking. The example form we are creating will include a title, editor, featured image and category fields.
Creating a Caldera Form
- Login to your WordPress dashboard.
- Navigate to the Caldera Caldera Forms admin page and the click the New Form button
- Select the “Blank Form” template.
- Add the following fields to your Caldera Form:
- Title – A single line text field. Use the “{embed_post:post_title}” magic tag to pre-populate with the saved post title.
- Content – A WYSIWG/rich editor. Use the “{embed_post:post_content}” magic tag to pre-populate with the saved post content.
- Featured Image – Single text field. Be sure to set Add to Media Library in this fields settings.
- Categories – A checkbox field. You can use the auto-populate option to automatically set the checkbox options to be all categories. To do this, check the Auto Populate checkbox and then, select Taxonomy and then Categories.
- Submit – a button field. Make sure to use the default option for Type which is submit.
- Save your form by clicking the Save Form button at the top of the form editor
Setting up the Save As Post Type Processor
 To edit a post on the front-end with Caldera Forms makes use of the Save As Post Type processor which allows data from Caldera Forms to create/edit posts, custom post types and pages within WordPress.
In the settings for the processor, you will be using dynamic values — values from the form or values from the post the form is loaded in. This is where Caldera Forms magic tags are very helpful.
- Inside your form editor, go to the Processors tab and then click the add Add Processor
- Select the Save As Post Type processor
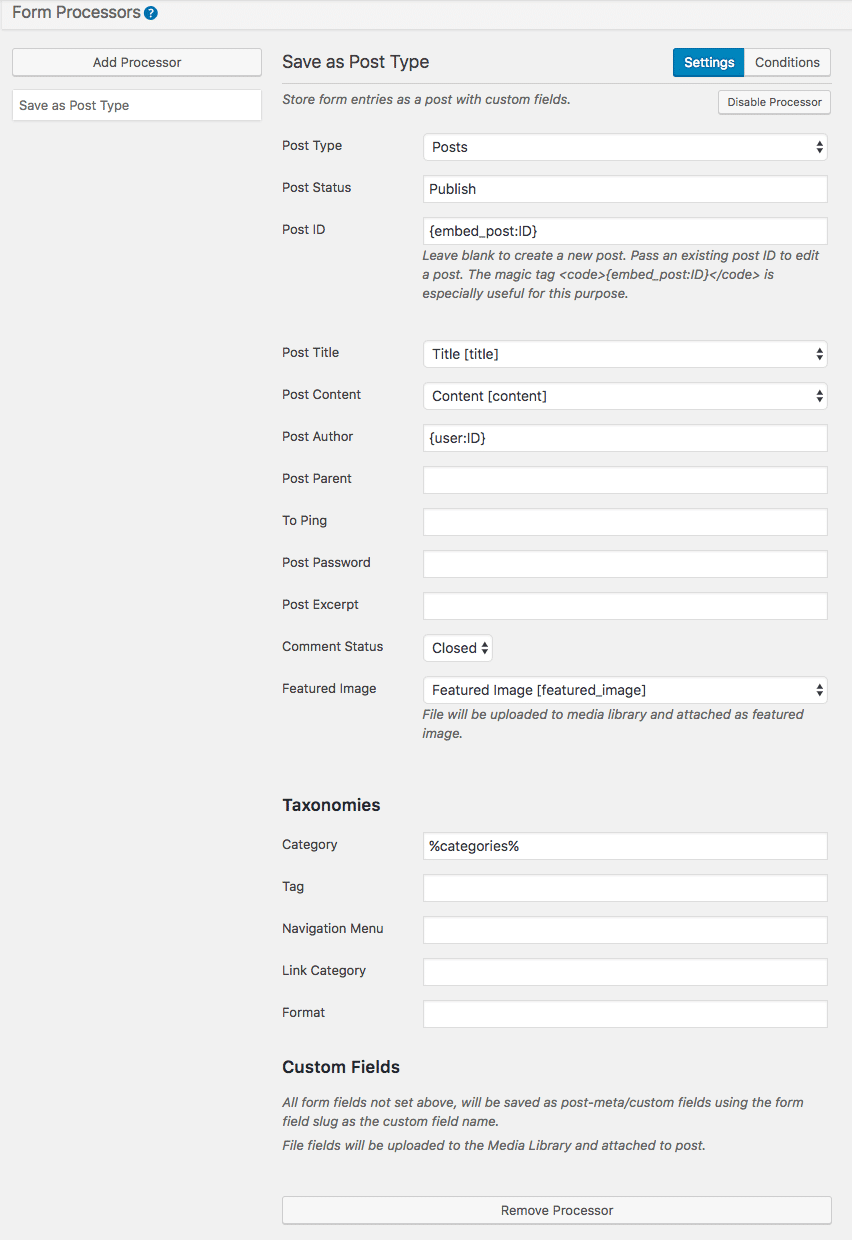
- The processor has multiple settings, we will be focusing on a couple of settings –
- Post Type – Set this to “post”, if you are wanting to insert into a custom post type or page choose the relative option.
- Post Status – Set this to “publish”. Be careful with this field, you must use the name, not the label of the post status. IE don’t use “Publish” instead use “publish.”
- Post ID – This is the most important setting in this example. Use the “{embed_post:ID}” magic tag, this will automatically pull the post that the form is loaded in’s ID when editing the post. If you leave this blank, a new post will be created instead.
- Post Title – Set this to the “Title” field we created previously.
- Post Content – Set this to the “Content” field we created previously.
- Post Author – Set this to use “{user:ID}” magic tag, this will set the author of the post to the last person that submitted the form.
- Featured Image – Set this to the “Featured Image” field we created previously.
- Categories – Set this to the “Categories” field we created previously.
- Save your form by clicking the Save Form button at the top of the form editor.
Additional Settings For Caldera Forms Front-end Post Editing
- Disable AJAX Submissions :Since we are updating a post, it is key to disable Ajax submissions so the post we are editing can reload and show the newly updated information. To do this navigate to Form Settings and uncheck AJAX Submissions.
- Disable Entries: To disable entries from being saved in Caldera Forms, navigate to Form Settings and set Capture Entries to Disable.
- Disable Email Notifications: Since we do not need email notifications for this type of Caldera Form we can disable these alerts. Navigate to Email and click the Disable Mailer button. This will stop the form from sending email notifications entirely.
Adding The Post Editor Caldera Form To A Post

The {embed_post:ID} magic tag feature, mentioned earlier, while dealing with the Save As Post Type processor, will automatically populate the fields in your Caldera Form as long as the form is included in the post/page you’d like to edit. If you paste in the shortcode into a blog post you will see that the form populates the relevant data.
This is great! It’s working, but this means that anyone that views the post will be able to edit the post by simply editing the form.
To get you started, you may download the front-end post editing with Caldera Forms example form here.
Technically you could use the Caldera Forms shortcode to output this form, but when the form edits to content, you will lose the shortcode. Instead, you can use the_content filter to show the form after the post content. Displaying the form this way will help you control who can edit the content. It also means you don’t have to add a ton of shortcodes.
In this example below, we will check to see if the user is viewing a single post and has permissions to edit the post. If they are we will show them the Caldera Form we created in this example at the bottom of the post, if not it will be hidden on the front-end from all users.
Make sure to change the form ID to match your form ID.
Going Further
This is a basic example. Here are some simple changes you could make to accomplish other goals:
- Instead of using this as a form editor, you could use this form for post submissions.
- Change Post Status setting to “pending”
- Leave the Post ID setting empty.
- Output the form in a page using the shortcode.
- Use other post types.
- If you are using an eCommerce plugin based on a custom post type, a version of this form could be used to create products.
- Charge for guest posts.
- Add a Caldera Forms payment processor and then the post will not be created unless the payment goes through.