The Aweber for Caldera Forms add-on provides an easy way to use Caldera Forms to subscribe visitors to your Aweber mailing list. You can integrate Aweber sign up into your contact form or use Caldera Forms to build a mailing list optin form.
In this tutorial I will show you how to create a contact form with optional Aweber sign up. You can apply what you have learned here to building other types of forms with Aweber.
Before You Get Started
When you purchase Aweber for Caldera Forms, or a bundle that includes it, you will get a ZIP file for the add-on plugin in your email and it will be available in your account page. Make sure you already have Caldera Forms installed. You can install this zip file form by uploading it through the WordPress plugin installer.
When you active the Aweber for Caldera Forms add-on, you will be prompted to active your license with the CalderaWP license manager. Licensing and other helpful account management steps are documented here.
You will also need to create an Aweber account with you have not already done so, and created at least one list in that account. You may wish to create an Aweber application, but this is optional, and one is provided for you.
Creating A Contact Form With Aweber Sign Up
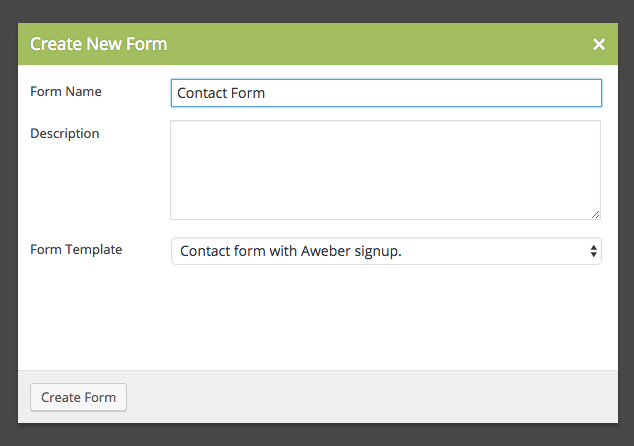 Now, go to the Caldera Forms main admin page and click the “New Form” button at the top of the screen. In the new form modal, choose to start from a template and choose the Aweber example contact form.
Give the form a name and then click “Create Form.” This will save your form and take you to the form editor. As you can see, the layout for you form is already added for you.
In addition, under the processors tab, a Aweber for Caldera Forms processor should has already have been added. If not, click the “Add Processor” button and choose Aweber from the processors list.
 At this point you will need to authorize your site to work with Aweber if you have not already done so. Click the “Get Authorization Code” button. This should open a new tab on Aweber’s site. On that site page you will be asked to log in to your Aweber account.
Once you have logged in, you will be given an authorization code. Copy this and then go back to the tab with your form editor. Paste the code into the next box and then click the “Save Authorization” button.
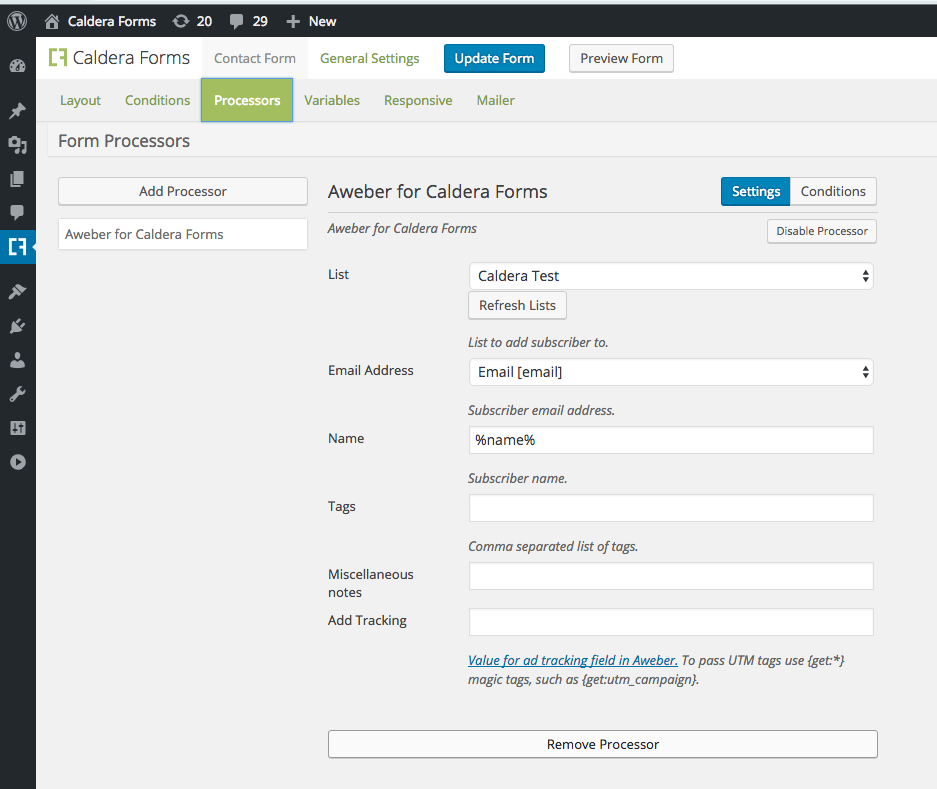 Once saved, you will see the Aweber settings for this form. In these settings you must select the list you wish to add users to, and map an email field and name field.
If you do not see any lists, click the “Refresh Lists” button. This button is useful if you need to change which list your form will ad users to.
You can optionally set tags, notes and add tracking. All of these fields, besides email, can be set using any text or a magic tag.
Save your form and you are ready to go!