By default, Caldera Forms submission data is stored in the database and emailed to the site administrator. For some users, this or what can be done with an existing add-on plugin, is sufficient, but some developer may need a more customized solution for the needs of a specific site or application they are building.
This tutorial will show you two ways that you can capture the data from a form submission and use it in whichever way you need. It will cover firing a WordPress action, with all data from the form submission exposed and running a JavaScript callback function on form submission.
You could also create register your own Caldera Forms processor, if you need an admin UI for it. How to do that will be covered in a future tutorial in detail. A simple example of how to do so is provided here.
These two methods — using a hook, or a JavaScript callback — allow developers to use Caldera Forms as a front-end UI tool, while processing the data, and responding to it dynamically according to their own needs. Combined with the ability to save and manipulate form settings in the file system, the form validation and entry tracking in the database, Caldera Forms is an excellent tool for developers with advanced and unique needs.
Using A WordPress Hook
 The easiest way to capture data from a form submission and pass it to a WordPress hook, is using the Caldera Forms Run Action processor. This simple processors allows you two set a WordPress action to run, which is passed the current submission’s entry data.
You can use as many of these processors as you want in a form. This is useful if you want to fire multiple actions, or if you want to use Caldera Forms’ conditional logic to fire different actions based on the inputted data.
Here are two simple examples of how it can be used:
You can also create a very similar system, without the Run Action processor, using the “caldera_forms_submit_complete” action. This action passed the complete form configuration. You can use Caldera_Forms::get_field_data( ) to get the entry data for each field, as shown below:
Using A Custom JavaScript Callback Function
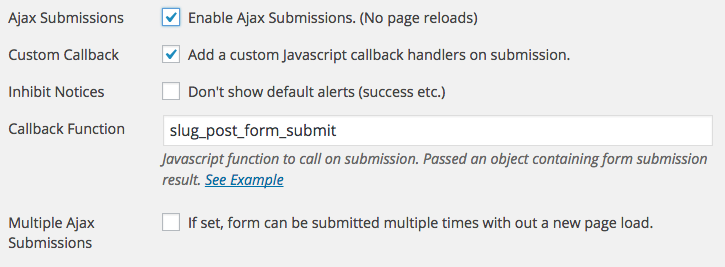
 In the “General Settings” tab of the Caldera Forms editor, there is a setting called “Custom Callback.” In this setting you can set the name of a JavaScript function to be called. This function will run after the form submission process is done via AJAX. This means that all server-side processing, including form validation, entry tracking (if enabled,) and any processors added to the form.
Please note, that Connected Caldera Forms does not support this feature. See this doc for more information.
This function will be passed an object containing information about the form submission, and the form. In addition it contains an object called data. This will, contain an index “cf_id” with the form entry ID. In addition, it will include any “passback variables” you have set in the “Variables” tab.
Normally passback variables are used to pass variable from the form to the redirection URL. This is useful for forms that trigger redirects, and need to pass data, as GET variables to the next page request. Since passback variables are also included in this object, they can be used, after an AJAX submission to use the form results dynamically.
For example, imagine an order form that was displayed on an account page that showed total charges. In order to remove the need to refresh the page after a new order, you could add order total as a passback value, like this:

Then in your JavaScript callback function, you can create a new object out of the details from the submission, like this:
Note that I used the “status” index to ensure that the object is only created when form submission is successful.
More Hooks and More Information
This article is a brief overview of a few ways to modify processing of Caldera Forms submissions. We also have documentation for our filters and actions. Here is more suggested reading for understanding how to customize Caldera Forms to fit your needs:
- Overview Of Form Processing in Caldera Forms
- Creating a Custom Validation Processor
- Creating Caldera Forms Processors
All Power To You
Creating great looking forms, with as complex as conditional logic as you need, is something that Caldera Forms excels at. Using Caldera Forms to create the front-end interface for a WordPress-powered app, or in any site with lots of user interaction, will save you a ton of time. In these types of projects, it is hard to rely on “off the shelf” tools to do exactly what you need with the submissions.
The examples I have shown in this tutorial illustrate how to expose submission data for use server-side or client-side. I trust that as a talented developer, you will be able to use this to do whatever you need with your data.
