Caldera Forms is one of the most intuitive and easy-to-use form builder plugins for WordPress available. Because of its ease it is a great option for users of all levels, beginner to advanced, DIY-er to professional. Styling the forms may not be something everyone knows how to do, so we’re going to be adding a few tutorials to our blog that show the steps for adding some styling via CSS and the WordPress customizer.
In today’s tutorial we’ll be using a Genesis site in our example, but the code snippets used in all of our styling tutorials really could be used on any WordPress website using any theme. The way we can ensure this is we’ll be using our own Caldera Forms classes, so anywhere you install the Caldera Forms plugin our classes will already be on your site.
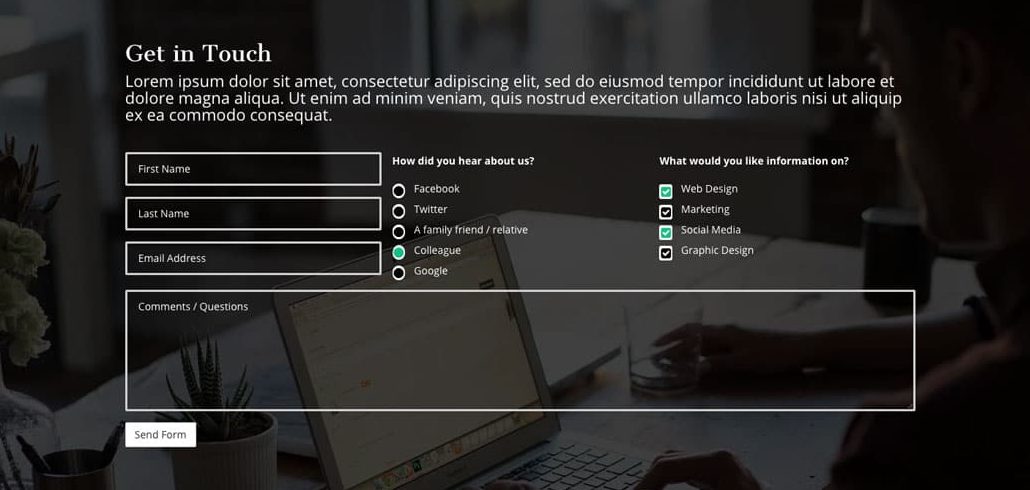
Transparent Form with Font Awesome Radio & Checkbox Icons
This is the look we’ll end up with today after applying our CSS. It’s a transparent form with our selected background image showing through, and with a bit of radio button and checkbox styling using Font Awesome icons.

Inspiration
This has been a widely popular look for contact forms on websites for at least a year or so. I don’t see the style going away anytime soon because it is a great way to give some “oompf” to any basic form. It’s important to keep readability in mind, make sure you have a dark enough photo behind and that the content of the photo isn’t demanding too much attention. The photo doesn’t have to have a black or grey hue to it, a colored overlay would look really nice as well.
Getting Started
 To get the full effect of this look on a Genesis site you most likely will already be using a Genesis Child Theme that is featuring a background image sitewide. I’ve already added my Backstretch Image in my customizer (do this if you haven’t already). Next there are two things we need to do before we begin adding our form CSS snippets for styling:
- On Genesis there’s no quick setting to remove the default white background from your page entry’s content on a per page basis, so we’ll need to first make the background of the page where we are inserting our form transparent.
- Also since we are using Font Awesome icons for our radio and checkbox styling we need to import their icon library into our site.
We’ll need do a bit of footwork to grab a page ID and to edit our child theme file, but I promise it’s not hard.
Finding the Page ID
Go into the page you will be adding your contact form to and your URL should look something like this:
![]()
You’ll see a number, that’s your page ID. In my case it’s “80”. Make note of this number because we’ll need it for our first CSS snippet.
CSS to Give Your Page and the Caldera Forms a Transparent Background
 Once you get that number you’re going to replace the number 80 in code below with your number, then copy and paste all the CSS (minus the comments if you prefer) into your child stylesheet or into the Customizer > Additional CSS box. The first bit of code is making the body of your content area transparent; the second bit is making the background of your form transparent.
Quick note: If you’re not using Genesis you can still use this tutorial, but you might not need the first bit of code. It will depend on the settings available for your page via your chosen theme/framework.
Adding Font Awesome
Go into your child functions.php and add the following code. This is bringing Font Awesome’s latest library of icons into your site (it’s updated automatically). There are other ways to import their library, I just prefer this method as it takes up no space on your server, so you’ll experience no slower load time or anything like that.
Now to the Good Part
Copy and paste the following CSS in the same place you pasted the previous CSS. Note the areas where I commented where you may want to change certain colors of the text or the colors of the Font Awesome icons. You can change the icons themselves if you’d like using the FA cheatsheet list of icon codes, but see my notes at the bottom of this post before doing so.
And there you go 🙂
You should have a really sharp transparent form for your Genesis site, or whichever chosen theme you are using.
I do need to mention that this method is not the only method to replace radio buttons and checkboxes on forms. Caldera Forms has radio buttons and checkboxes nested inside the label, so where I would typically use the label as an activation trigger and replace the default button with an icon, I wasn’t able to do that here. The Font Awesome icons are actually covering the original default buttons instead of replacing them, so when I mentioned earlier that you could replace the icons with others from the FA library you’ll need to keep that in mind. I chose these icons because they already mimic the round shape of the radio and the squarish shape of the checkbox. I had to get a bit creative by adding a background color to make sure the defaults were fully covered.
Also I need to note that this method isn’t fully compatible with Firefox and I wasn’t completely happy with how it looked on mobile, so I’ve purposely included code to keep the FA icons from showing up on the Firefox browser and on smaller screens sizes.
I believe there is a more advanced way via changing the file for specific fields, which you can get more info on here, but for the purposes of trying to stick to CSS as much as possible and to target a more novice audience, this is the route I took. In some respects this method is a workaround — but still very effective!