Creating a front-end user registration form for WordPress websites are becoming popular amongst WordPress website owners. In this tutorial you will learn just how easy it is to allow users to register through a page or post of your WordPress website using Caldera Forms.
In order to get this working it is required to have Caldera Forms Users add-on installed and activated.
Creating The User Registration Form
 Inside your WordPress dashboard, click Caldera Forms and then select New Form. In this example we will be using a blank template. A login/register template is available for you to use and experiment with.
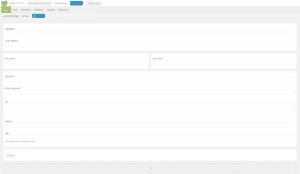
Registering a user requires only two fields which are the username and email fields. It’s advised to collect more data than just these fields. In our example we will create all the necessary fields and some extra fields that will be used as additional user meta. We will be adding the following fields:
- Username – Single text field.
- Email – Email field.
- First Name – Single text field.
- Last Name – Single text field.
- Password – Password field.
- Bio – Paragraph field.
- Website – URL field.
- Age – Number field.
- Register – Submit Button.
You do not need to use the password field if you would like WordPress to generate a password for the user.
I have added some styling to the form as I like to have the First Name and Last Name fields next to each other. This is entirely up to you. Once these fields are added, your form is nearly ready for users to start registering on your WordPress site.
Setting Up The User Registration Processor

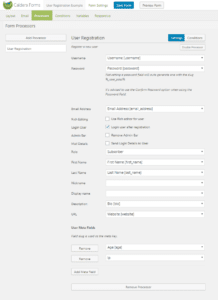
To add the user registration processor, simply select Processors tab at the top of the form builder page and Add Processor and select the User Registration processor. With the Caldera Forms User add-on this gives you the ability to register, login or update WordPress users using Caldera Forms.
Once the processor has been added you will need to match up the fields from the previous step.
The user registration processor comes with some additional settings that help choose what happens next when the user registers successfully. This includes sending the user an email with their login details, remove the admin bar, login the user after they’ve registered and use a rich text editor such as the WYSIWYG field Caldera Forms offers. You may also set the default user role when a user signs up using Caldera Forms. If you are uncertain about what role to assign a user, here is a useful list of default user roles WordPress has to offer.
I have left out the display and nickname fields as WordPress will generate these fields and users can change them in the
I have an extra field for the users age and IP address. These fields will be recorded as additional meta. Find out about using the {ip} magic tag in Caldera Forms.
Adding The User Registration Form To The Front-end Of WordPress
To add this form to the front-end of your website, simply create a page called register and paste the Caldera Forms shortcode into the page. Whenever a user lands on this page, they will be able to register.

Users will be able to register and automatically added to your WordPress users section of your site. You may download the form example from here.
Conclusion
I hope you have found this tutorial helpful and can make good use of it on your WordPress website. In closing, you are able to embed this form anywhere in WordPress that accepts shortcode. This should increase the count of your WordPress users.

Hi, I have created a login/registration form. Upon login, the processor still sends emails to admin.
What could I have done wrong?