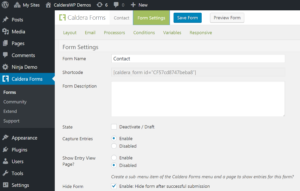
This getting started guide article covers the processes of configuring Caldera form settings. These control the standard settings for each individual form built within your current instance of Caldera Forms. You can easily mistaken this for configuring global email settings, which is an entirely different process. Get more information on configuring global email settings by visiting our General and Email Settings Guide.
Configuring Caldera Form Settings
These settings control standard form settings like form name, form description, and other specific options.
Steps To Configure Form Settings
Step 1 : Go To The Caldera Forms Admin Page And Create Or Edit A Form
Starting from the WordPress Dashboard, you can navigate to the Caldera Forms Admin Page by hovering over the Caldera Forms icon and in the drop-down menu clicking on Forms. Create a new form by clicking on New Form in the top Caldera Forms menu bar. Edit an existing form by hovering over 1 form from the list of built forms and clicking on Edit. You are now in the Caldera Forms Layout Builder.
Step 2 : Go To The Form Settings Tab
You can navigate to the Form Settings tab by clicking on Form Settings in the top Caldera Forms menu bar.
Step 3 : Configuring The Form Settings And Saving The Form
 Form setting configuration has 13 options:
- Form Name – This gives your individual form a unique name.
- Shortcode – This is not an option you can change, however you need this shortcode to integrate the form into a page or post.
- Form Description – This gives your form a unique description.
- State – If checked, this deactivates the current form.
- Capture Entries – This enables entry tracking in the database. If enabled, form entries are saved. If disabled, no entries are saved.
- Create sub-menu entry viewer – If enabled, this option creates a sub-menu item of the Caldera Forms menu and a page to show entries.
- Hide Form – If enabled, this option hides the form after successful submission.
- Honeypot – If enabled, this option places an invisible field in the form to trick spambots.
- Success Message – This sets the message displayed after a user submits a form.
- Gravatar Field – This sets the Gravatar when viewing an entry from a non-logged in user.
- AJAX Submissions – If enabled, this option ensures that the page does not reload after a user submits a form.
- Custom Callback – If enabled, this option adds a custom Javascript callback handler on submission.
- Multiple Ajax Submissions – If enabled, the form submits multiple times with out a new page load.
Finish entering all of your form settings and click on Save Form.
Get more information on custom Javascript callbacks by visiting our Custom Processing of Caldera Forms Submissions documentation.
