
You could do everything from letting visitors submit blog posts to creating a submission form for a business directory and a whole lot more.
To help you accomplish that, we’re going to show you how to accept user-submitted content on your site with Caldera Forms and then display it on the front-end using a plugin called Posts Table Pro.
Here’s a quick example of the type of system that you’ll be able to build by the end of this post…
First, visitors will submit a form…

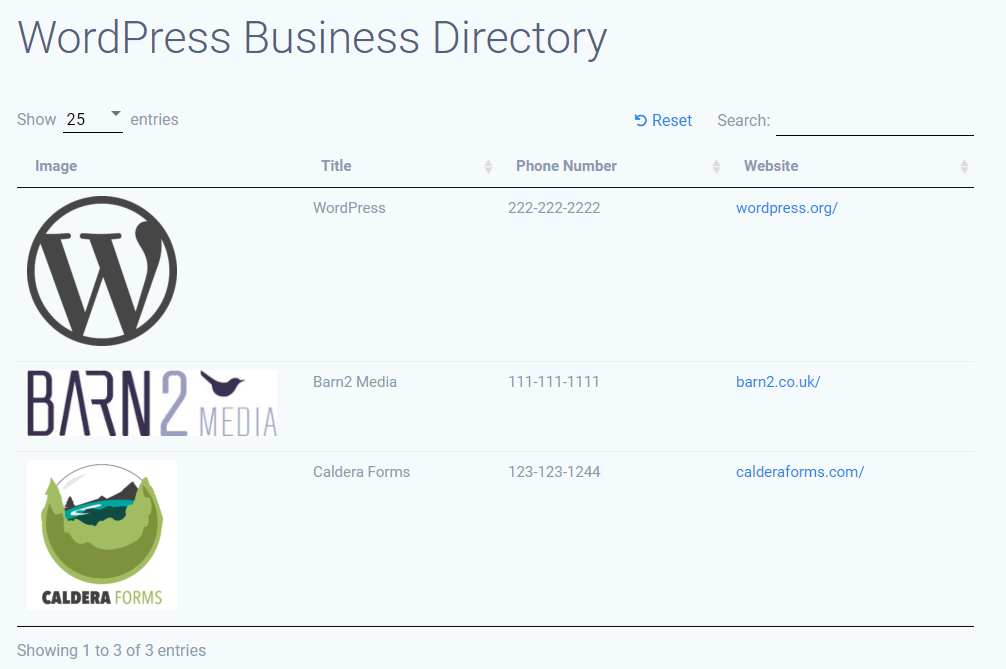
Then, that information will be stored in a post type and displayed on the front-end of your site in a searchable, filterable table like this:
What You Can Build With This Functionality
While the example that we’ll cover in this article is a business directory, there are a lot of different ways that you can apply this functionality.
At a basic level, you’re learning how to:
- Accept any type of content via a form
- Store it as a regular post or page, or in a separate custom post type
- Display that content in a searchable, filterable table on the front-end
You can use it for:
- All types of directories – businesses, members, local basketball courts, hiking trails…anything.
- A document library – individual users can submit documents to be added to the library.
- Job listings – let businesses submit their jobs via a form.
- Front-end post submissions – let registered or guest authors create posts from the front-end.
- Testimonials – let happy customers share their thoughts via a form, then display them on the front-end (after you manually approve them, of course!).
- User-submitted events – let third parties share events to create a sort of community events site.
You can probably think up plenty of other uses, too.
The Three Plugins That You’ll Need To Follow This Tutorial
To follow this tutorial, you’ll need three WordPress plugins:
- Caldera Forms – this lets you build the form.
- Caldera Forms Custom Fields – this add-on lets you save your form inputs as WordPress post types.
- Posts Table Pro – this plugin lets you display the information that your users submit in a flexible table layout.
And you might optionally need a free plugin called Pods if you want to collect custom data. This depends on what type of information you want to collect with your form – more on this later.
Once you have those plugins, follow this step-by-step guide…
Step 1: Choose Where To Store Your Front-End Submissions
The first thing that you need to figure out is where you’re going to store the information that users submit via Caldera Forms.
You have a couple of options here.
First, you can always just store form submissions as a regular post or page. This is a good approach if you want to, say, let people submit guest posts from the front-end of your site.
However, storing submissions in a post or page isn’t ideal for most situations because it means that the user submissions are going to be mixed in with your own content, such as your blog posts.
So most of the time, you’re going to want to use a custom post type.
Let’s consider the example of a business directory…
The optimal strategy here would be to create a custom post type for Businesses. Then, when users submit the form, that data will be neatly stored as a business, completely separate from your regular blog posts.
To create a custom post type, you can use the free Pods plugin.
Here’s a quick rundown on how to use Pods (it’s easier than you might think!)…
Create A New Custom Post Type
Once you’ve installed and activated the free Pods plugin, head to Pods Admin → Add New.
Then, click Create New and enter the information for your post type:
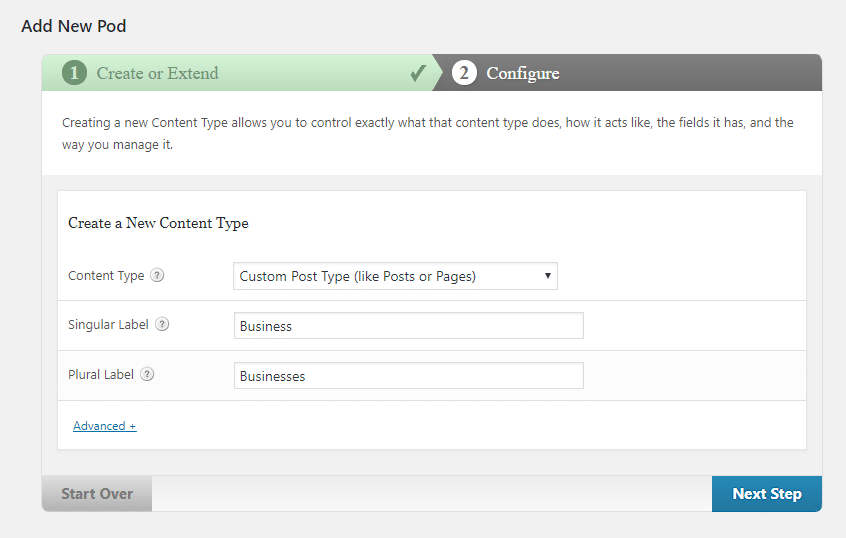
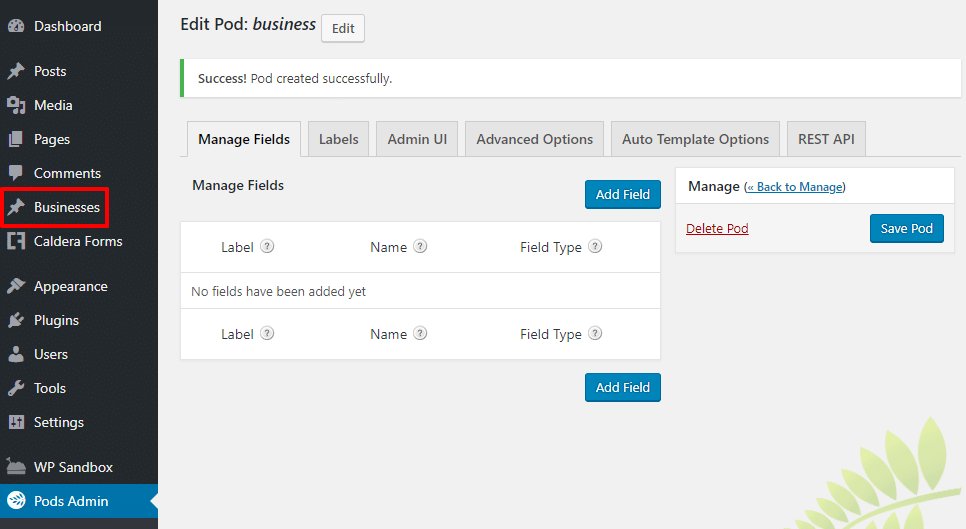
And just like that, you have a new post type for businesses!
Consider Adding Custom Fields To Store Information
At this point, you could technically just head off and create your front-end submission form with Caldera Forms.
But for most uses, you might also want the ability to store a little more information about your post type.
For the business directory example, you’d want a business’:
- Website
- Phone number
- Etc.
To store that information, you need to add a custom field for each piece of data, which you can do by clicking the Add Field button in the Pods interface.
From there, use the Field Type drop-down to select what type of information you want to collect. Then, enter the other information (label, formatting, etc.):

Step 2: Create Your Front-End Submission Form With Caldera Forms
Now that you have a spot to store your front-end form submissions, you’re ready to use Caldera Forms to create the form.
Remember – you’ll need both the free core Caldera Forms plugin and the Custom Fields add-on.
Create Your Basic Form
To create your form, go to Caldera Forms → New Form in your dashboard.
For now, you just want to build the form’s layout and fields – don’t worry about connecting the data to your post type.
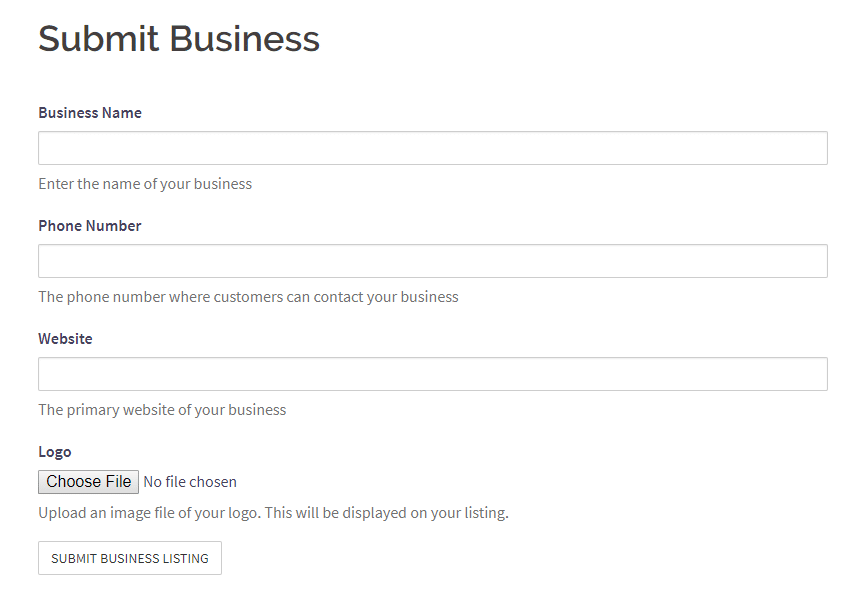
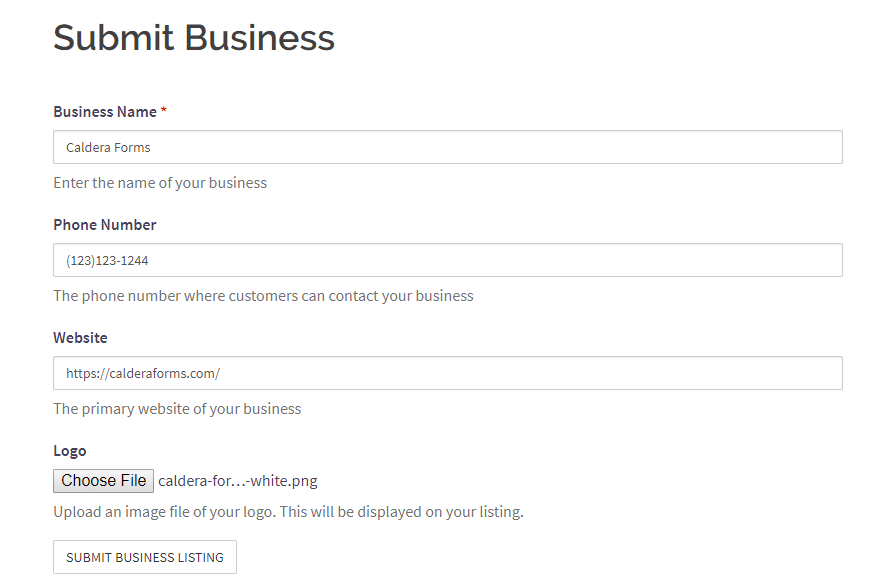
So…using the drag-and-drop editor, add all the fields that you want. Here’s what a form might look like for a basic business directory submission:

Beyond the fields for phone number and website, you can see that we’ve also added a file upload field where businesses can attach their logo (you’ll see how this works in a second).
Match Form Field Slugs To Custom Fields Slugs (If Using Custom Fields)
For any custom fields that you’ve added with Pods, you’ll want to make sure that the form field’s slug matches the custom field’s name. This will make it easier to manage your custom fields on the back-end in the future.
To find your custom fields’ slugs, go to the Pods admin for your custom post type and look at the Name column:
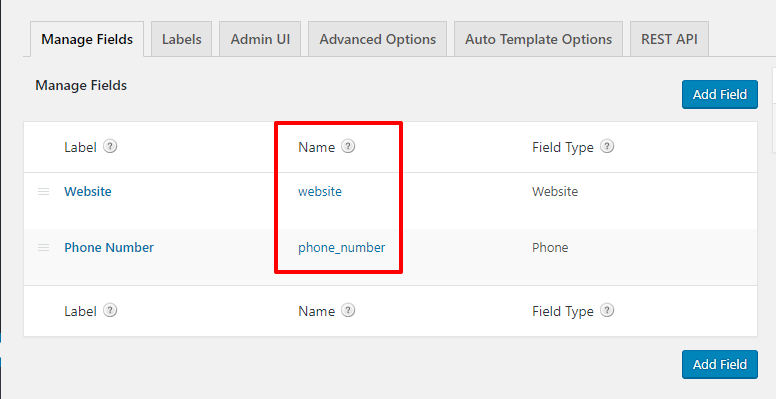
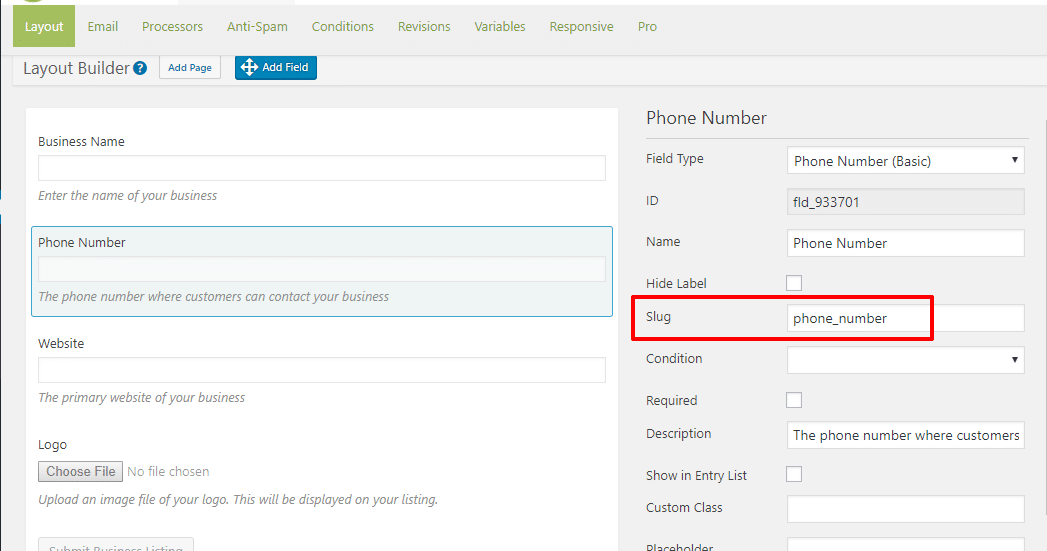
Then, make sure the values in the Pods Name column match the values in the Caldera Forms field slug box. For example, look at the phone number field:
- The Pods name is phone_number (you can see that in the screenshot above)
- The Caldera Forms field slug is also phone_number (you can see that in the screenshot below)
And that’s it! You’re halfway done. Here’s what the form looks like on the front-end:
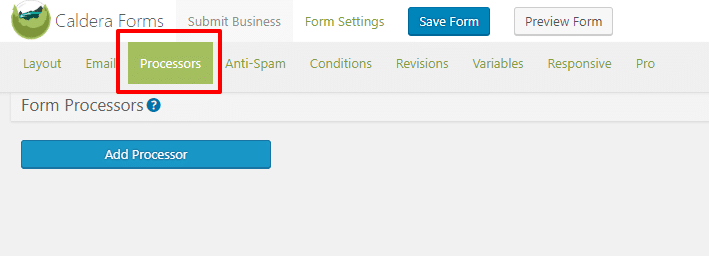
Use Processors To Connect Form To Custom Post Type
Now, you need to connect those form fields to the post type you selected in Step 1. This is what makes it so that when a user submits the form, that data goes straight into the relevant post type.
To do that, go to the Processors tab in Caldera Forms and select Add Processor:
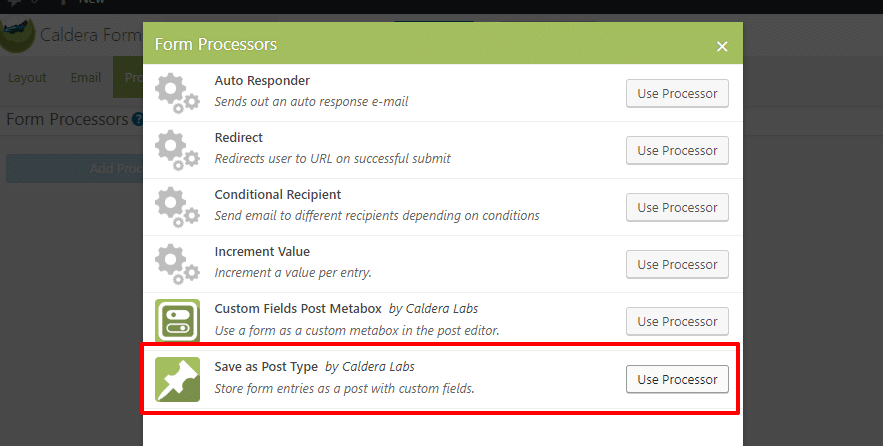
Then, choose Save as Post Type from the available Form Processors:
Now, you should see a lengthy list of settings.
First:
- Select the relevant Post Type from the drop-down. For this example, we want the Businesses post type that we created with Pods in the previous step.
- Enter %status% in the Post Status field
- Leave the Post ID field blank (this tells Caldera Forms to create a new entry for each form submission):

Then, use the other drop-downs to map your form fields to the post content as needed (read a deeper guide here).
For this example, we’ve:
- Set the Post Title and Post Content equal to the business name
- Assigned all posts to the Admin user (because we’re allowing anonymous post submissions. Alternatively, you could assign it to individual users if only logged-in users can see the form).
- Set the Featured Image equal to the logo upload field
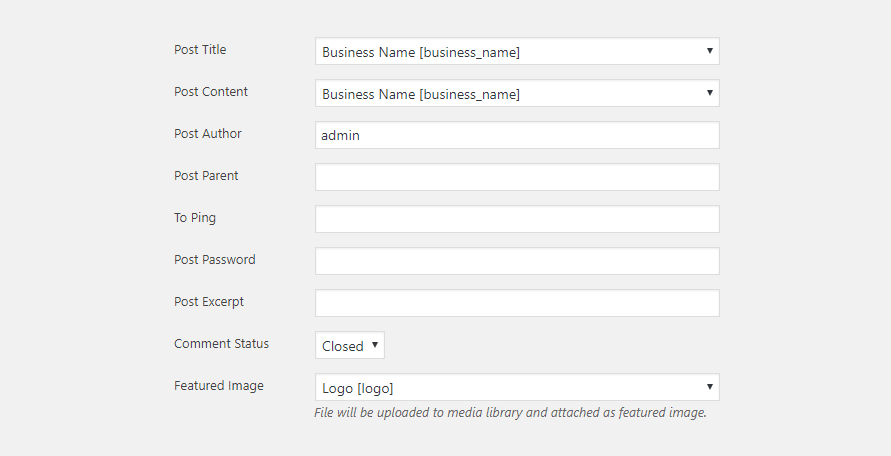
Depending on what form fields you have, you might want to configure additional information.
One more thing – you might be wondering what about the fields for Website and Phone Number? What happens there?
Well, because you made the custom field name and the form field slug match, information from those form fields will go straight into the custom field – no further configuration needed.
Putting It All Together
Once you add the Caldera Forms shortcode to a page on your site, visitors will be able to view and submit your form.
Here’s how it works:
First, a user fills out the form:
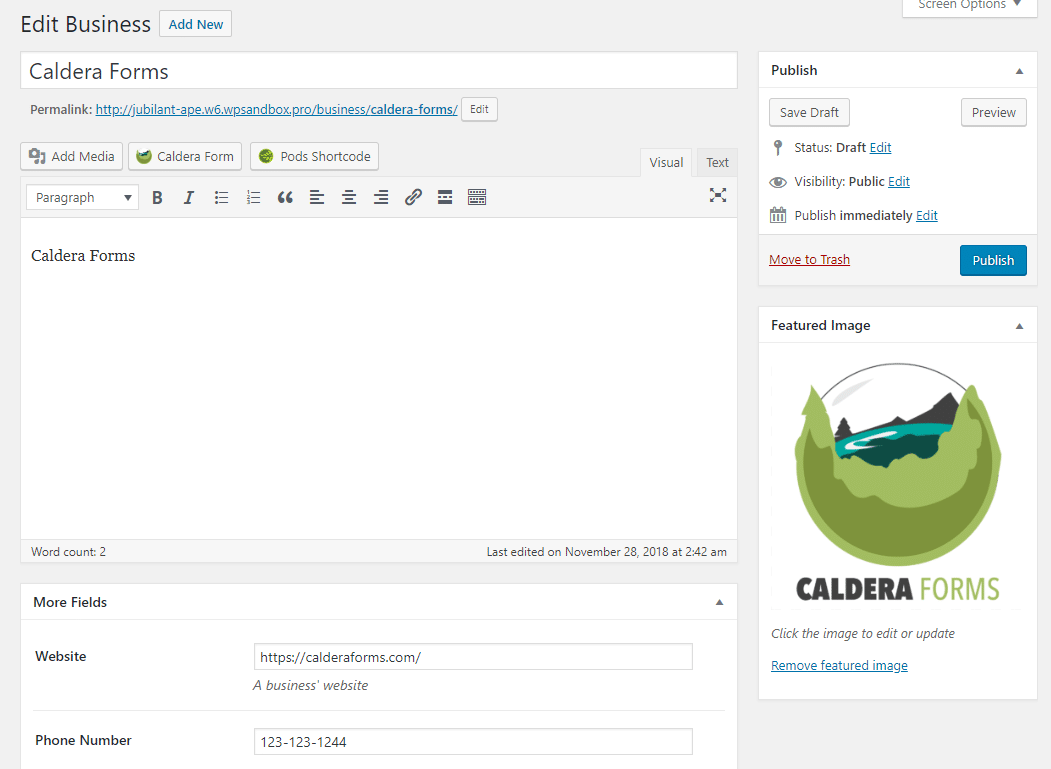
Then, you’ll see that form submission show up as a draft in the post type that you selected:

And if you edit that listing, you’ll see all of the information from the form, including the custom fields and logo:
You can then publish the user-submitted listing and make it live.
Step 3: Display Form Submissions With Posts Table Pro
Next, you need an efficient way to display all of those form submissions on the front-end of your site.
That’s where the Posts Table Pro plugin comes in. Here’s how to use it…
Configure Posts Table Pro Defaults
Once you’ve installed and activated the Posts Table Pro plugin, go to Settings → Posts Table Pro to configure the plugin’s defaults.
First, select the Post type that you want to display.
Then, you can configure which columns to display in the table (learn more about column options).
For this example, we’d want these columns:
- Logo – image
- Business name – title
- Phone number – cf:phone_number
- Website – cf:website
image,title,cf:phone_number,cf:website

Further down, you can also configure settings for features like:
- Image size
- Post limits and pagination
- Lazy loading
- Sort options
- Filter options
- Search options
Once you’re done, make sure to save your settings.
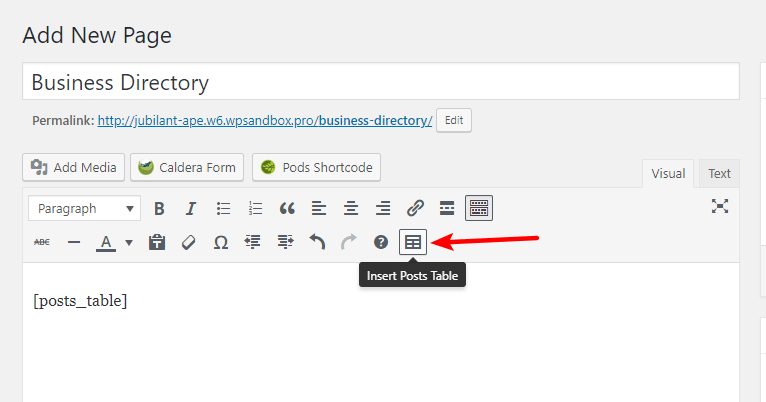
Add Posts Table Pro Shortcode
Next, go to the page where you want to display your table and use the Insert Posts Table button to add the shortcode:
If needed, you can also add some include/exclude rules to target specific content. For example, you could opt to only display posts with a specific category or tag. You can learn more about these rules here.
And voila! You should see a list of the form-submitted posts on the front-end:

Start Displaying User-Submitted Content Today
Now, you can accept any type of information via a form from Caldera Forms and then display it on your site in a searchable, filterable table using Posts Table Pro.
Remember, all you need to do is:
- Choose where to store form submissions and create a custom post type if needed
- Build your form using Caldera Forms
- Use a Processor and the Custom Fields add-on to connect your form fields to the relevant post type
- Use Posts Table Pro to display the post type on the front-end of your site
Finally, for even more flexibility, you can mix in some of Caldera Forms’ other add-ons. For example, you could use one of the payments add-ons to charge people a fee in order to submit their business to your directory. Get creative with it!