Caldera Forms has many type of select fields – dropdown, radio, toggle switch and more. These fields let you set either just a label for each option, or a label as well as a value. When you choose to set separate values for each option, you can also choose to set a calculation value for use with calculation fields. There are also auto-populate options and the ability to use and create presets.
Important: This document reflects improvements made in Caldera Forms 1.5.1. In previous versions of Caldera Forms, there was no Calculation Value setting.
Auto-populating Caldera Forms Select Field Options
One option is to forget setting the field options at all and to dynamically set them using posts (including post types) or taxonomies (such as categories, tags or custom taxonomies) or using Easy Pods or Easy Queries. To enable auto-population select the Auto Populate radio. This will cause a dropdown called Auto Type. In the is control, you can select one of the following auto types:
- Post Type – This will allow you to use all posts of a specific type as the field options.
- Taxonomy – This will allow you to use all terms of a specific custom taxonomy as the field option.
- Easy Pods – This will allow you to use Easy Pods to create a custom collection of posts, users, taxonomy terms, or any other type of Pod as your field options.
- This option is only available if Easy Pods is active.
- Easy Queries – This will allow you to use Easy Queries to create a custom collection of posts to use as your field options.
- This option is only available if Easy Queries is active.
- MailChimp Interest Groups – This will allow you to use a MailChimp list’s interest groups as the field options.
- This option is only available if the Caldera Forms MailChimp add-on is active.
Of course, these options can be customized using filters. See this doc for more information.
Working The With Post Type Field Option Auto Population
If you select Post Type as the Auto Type, you will see four new options:
- Post Type – This is the post type that will be used to populate the field.
- Value – This is what will be used as the option value attribute. You can choose Name for the post’s slug or ID the post’s ID.
- This setting can be further customized using the caldera_forms_autopopulate_options_post_value_field filter.
- Orderby – Use this setting to control which post field will be used to order the posts.
- Order – Select if the posts will be ordered in ascending or descending order of the orderby setting.
Working With Taxonomy Field Option Auto Population
If you select Taxonomy as Auto Type, you will see three new options:
- Taxonomy – Select which taxonomy that you want to use to populate the field with all terms of.
- Orderby – Use this setting to control which term field will be used to order the term.
- Order – Select if the terms will be ordered in ascending or descending order of the orderby setting.
Using Presets & Bulk Inserts
Clicking the Bulk Insert/ Preset button allows you to quickly add many options to your select field. When you click this button you will see a dropdown Select A Preset and a text area. You can use the presets to fill the text area. In that text area, usign a preset or not, you can type a list of options to bulk insert. You enter options one per line. Use a pipe character to seperate values form label.
For example, you could use:
One
Two
Three
Or:
1|One
2|Two
3|Three
Once you click the Insert Options button, this will replace all currently selected options. You can add new option presets using the caldera_forms_field_option_presets filter.
Manually Controlling Caldera Forms Select Field Options
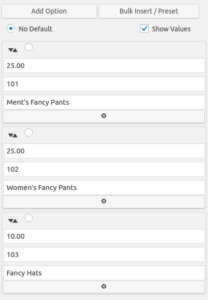
 You can also manually add option field options. To add a new option, click the Add Option button.
By default, you will just set the label for the option. In this scenario, the label will also be used as the option value. If you check the Show Values option you will have a Value and Calculation Value option. The Value will be used as the value attribute of the option. By default when using a select field with a calculation field the value will be used in the calculation. Because each value must be unique, this can cause problems if two options cost the same. This is why a Calculation Value is provided. This allows for two select field options to have the same cost.
Each option has a radio control to make that field the default. You can also use the No Default option. Each field also has a control you can use to drag the option into a different position in the option order. This is the little icon with two
Setting The Option Default
Each option has a radio button you can use to make that option the default option. There is also a Default Option setting which will overide the selection made in the options setting. The Default Option can be used to set the default value with a magic tag.
