This getting started guide covers the process of building a form. More specifically, learn how to use the responsive grid editor, add fields, add pages and configure fields.
Building A Caldera Form
If you have very specific specifications for a form, and you can’t find a pre-configured form template that matches your needs, you will need to build this form on your own, using our modern and flexible Form Layout Builder.
Step 1 : Go To The Caldera Forms Admin Page And Create A Form
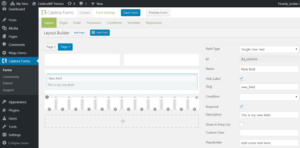
Starting from the WordPress Dashboard, you can navigate to the Caldera Forms Admin Page by hovering over the Caldera Forms icon and in the drop-down menu clicking on Forms. Create a new form by clicking on New Form in the top Caldera Forms menu bar. You are now in the Caldera Forms Layout Builder.
Step 2 : Using The Grid Editor

The grid editor in the Caldera Forms Layout Builder lets you add as many rows as you want and then split each row up to 12 times to create responsive form layouts. This section covers adding, moving and deleting rows, as well as how to add, split or combine columns.
Add a row by clicking on the grey + icon (with dashed border around it).
Split a row by clicking on the![]() icon. You can split a row into as many as 12 equal parts, but are not limited to any unequal number of parts between 2 and 12.
icon. You can split a row into as many as 12 equal parts, but are not limited to any unequal number of parts between 2 and 12.
Combine a row part by clicking on the![]() icon.
icon.
Move a row by clicking and holding the![]() icon and dragging the row to it’s new location, then releasing the mouse click. You can only move entire rows, no matter how many parts that row is in. Rows can only move up or down within the Layout Builder.
icon and dragging the row to it’s new location, then releasing the mouse click. You can only move entire rows, no matter how many parts that row is in. Rows can only move up or down within the Layout Builder.
Delete a row by clicking on the ![]() icon.
icon.
Step 3 : Add A Form Page
 Add a form page by clicking on the Add Page button. This adds a new page to your form that you configure separately from other form pages. Delete a form page by removing all rows on that form page and the page automatically deletes from the form. Change a page name or add breadcrumbs by clicking on the Pages tab in the Caldera Forms sub-menu bar.
Step 4 : Add A Form Field
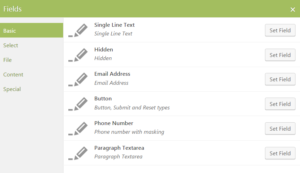
 Add a form field by clicking and holding the Add Field button and dragging it to a row or row part, then releasing the mouse click. This launches the Form Fields pop-up window. Insert the form field by clicking on Set Field.
Form fields are setup into 5 types:
- Basic – This includes Single line Text, Hidden, Email Address, Button,Phone Number, Paragraph Textarea and URL fields.
- Select – This includes Dropdown, Checkbox, Radio, Autocomplete, Date Picker, Toggle Switch, Color Picker and State/Province fields.
- File – This includes File Uploader and Advanced File Uploader fields.
- Content – This includes HTML, Summary, and Section Break fields.
- Special – This includes Gravatar, Calculations, UTMRange Slider, and Star Rating fields
Step 5: Configure The Form Field(s) And Save The Form
 Configure a form field by entering values in the options displayed directly to the left of the grid builder. Every field has different options to input and to delete a field by clicking on Delete Field.
You can find detailed information on how to configure each form in the field type documentation.
Once you have setup your form grid, click on Save Form.
